 Late Summer Y0 |
Sunny |
95°F / 35°C
Late Summer Y0 |
Sunny |
95°F / 35°C

Character Profile Customization
Updating character profiles can be a bit intimidating but it's not too hard. The easiset part is changing colors of things and we'll cover that first.
You can click any images on this guide to open them in another tab/window.
Additionally, there are two ways to apply color:Hex codes such as: #aa0000 this dark red.
RGB codes such as: rgba(200,40,50,1) this dark green.
With RGBA you can change the last number (the 1) to easily change the opacity of the color. So rgba(200,40,50,0.5) becomes rgba(200,40,50,0.5). RGBA is easy to understand because each value is described in order.
In this RGBA example your 40 controls red hues, 150 controls green, and 50 controls blue - and then of course the alpha at the end to change transparency. The red, green, and blue values of RGBA go from 0 to 255, and the last digit for transparency can be 1 and below
You can change the opacity of hex codes as well. You have to add two more digits at the end. Hex create colors in a range from 0-9 and then A-F. Adding 99 at the end should also equal 50% opacity. It ends up turning our red from above into this: #aa000099. The downside to this method is having to do the math yourself.
Hex codes are similarly structured in order for determining colors. The first two digits are red, the second two digits are green, the third two digits are blue, and the last two are your alpha for transparency. 0 is the darkest and F is the lightest.
OK, but how do I color the profile already?
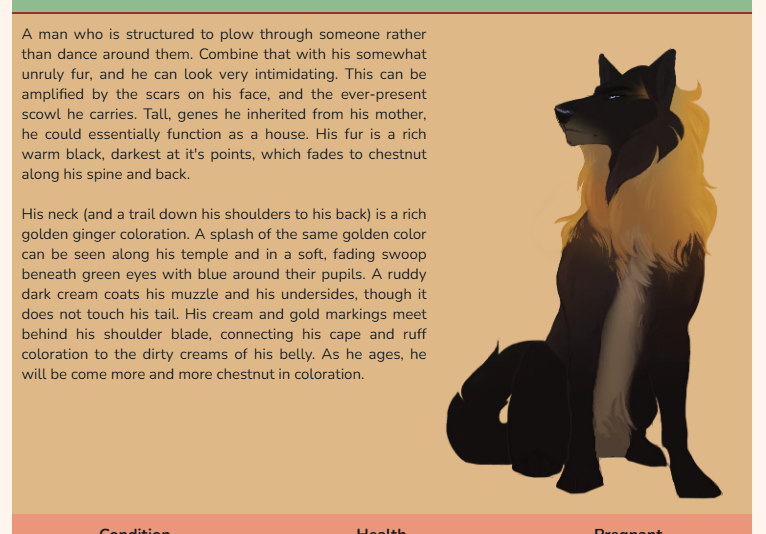
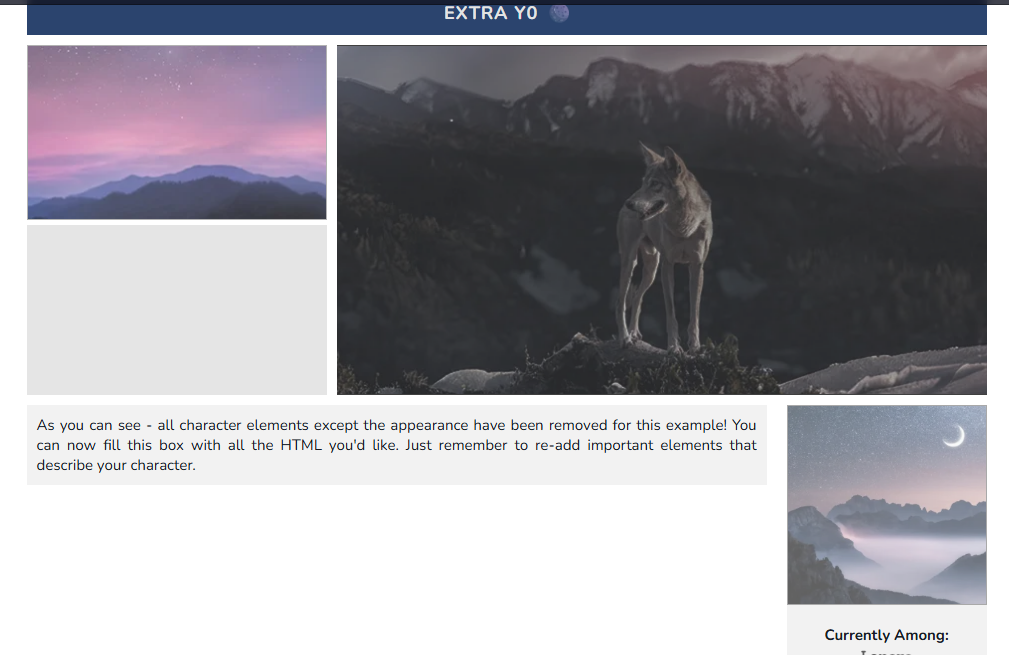
Well, I've broken down every variable that is used on character profiles so you can easily play with them and recolor the profile! The image below has everything color-coded for easier highlight and understanding. If you want to change very specific parts of the profile, add boxes, etc then check out the next section.
If you copy-paste this into your character profile and change the colors, it should change the colors of everything on the profile. Then, just adjust to your needs. Anything not affected by these varibles can be covered in the next section.
If you'd like to apply a background to your character's profile you can do so as:
This will seem like a lot - but you'll notice a lot of areas on this page use the same classes, just in different areas.
Now that you have that added, add this to your CSS box:
What this code does is tells the <div> inside your text area to treat everything inside of it as one row broken into columns. So it aligns everything left to right. You can add additional <p> tags to add more columns. You'll also need to add classes to any elements inside the div you add. For example, the image I included on Hélios' profile is class="app-img". This means that in the css I also have to add .app-img { width: 40%; }.
Using your own classes on any divs, spans, images, or other items you add means you style them as you like in the css!
For example an easy scrollbox is:
If you'd like to add custom spans or divs, you can do that too, but adding "style=" does not work inside character profiles. Instead, handle it like this:
If you also want to justify the text you can do text-align: justify; You can also add a border, change the background color, or honestly make any CSS tweaks you need. If you dont' know CSS or HTML well just ask, and one of us will happily help you make tweaks and adjustments. But! With these few tips in mind you should be able to fully customize your character's profile.
While you CAN apply display:none; to different parts of your character's profile, please do not apply them to:
The header and footer
The buttons to navigate the character hub
The buttons to access skills and threadlogs
The tables inside the skills/threadlog tabs
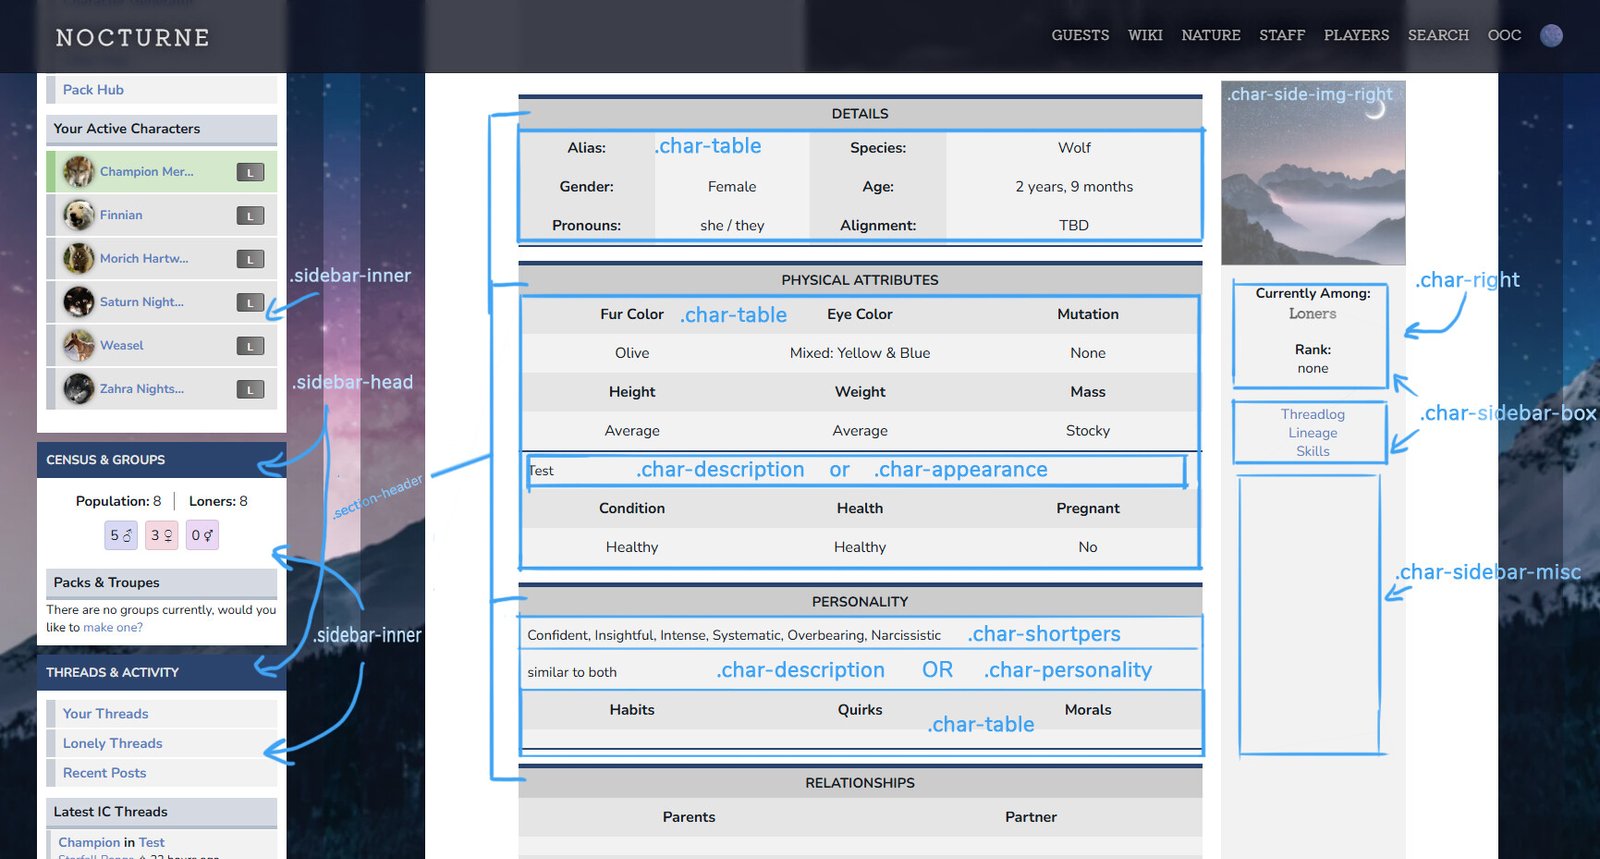
Also: If you hide anything inside .char-table (such as eye color, fur color, etc) then please add those details back into whatever you do have on the page.
Essentially, do not remove anything that allows people to perform basic functions or to navigate away. If you remove important character details please write them into the profile.
For quick reference, these are all fields you need to write back in if you remove them:
Full Name
Full Age
Species
Gender/Pronouns
All eye colors
Fur Color
Mutation
Height
Weight
Build
Condition/Health
If Pregnant
Personality (short or long or both)
If you'd like to remove all elements from a profile (after the gallery) you can add this to your css, and then add all content to the "appearance" box.
There are downsides to this!
If you hide all .char-table items then you lose valuable access to important details about your own character such as pregnancy tracking, live age tracking, etc. What you can do instead is be more specific and choose among these classes: .char-details, .char-details2, .char-details3, .char-attributes, .char-relations, .char-ooc.
If you add this, it will give you a result like:
You can additionally add .character-top to the list of elements you hide which will hide the character avatar, gallery, and other box and give you this as a result: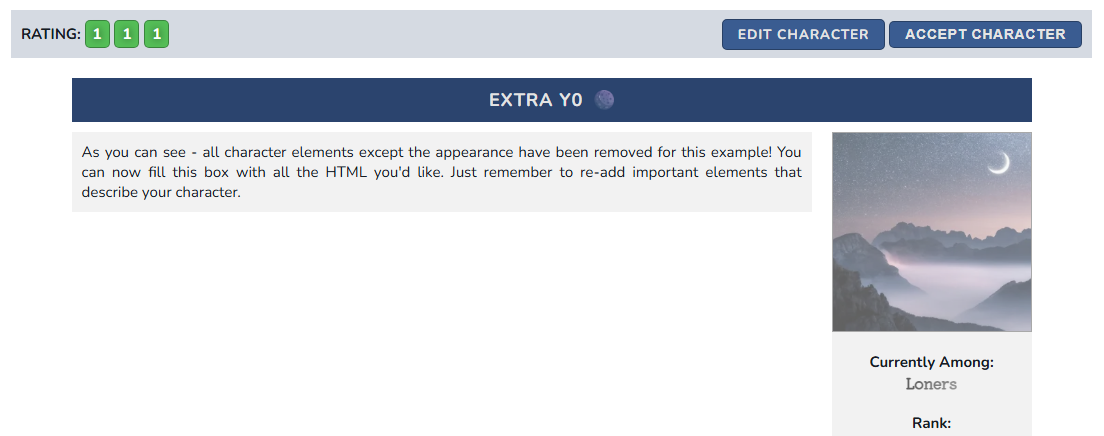
If you remove any elements and need to quickly re-add them, we have quick codes for that! So if you want to use the code I provided above to remove everything except the "appearance" div (or personality, or history - your choice), you can use the custom codes below to re-add required information in any format of your choosing. These codes work inside the appearance, personality, and history containers. So as long as you leave one of those showing and put these short codes inside of it, you can re-add any information you remove.
Coloring Character Profiles
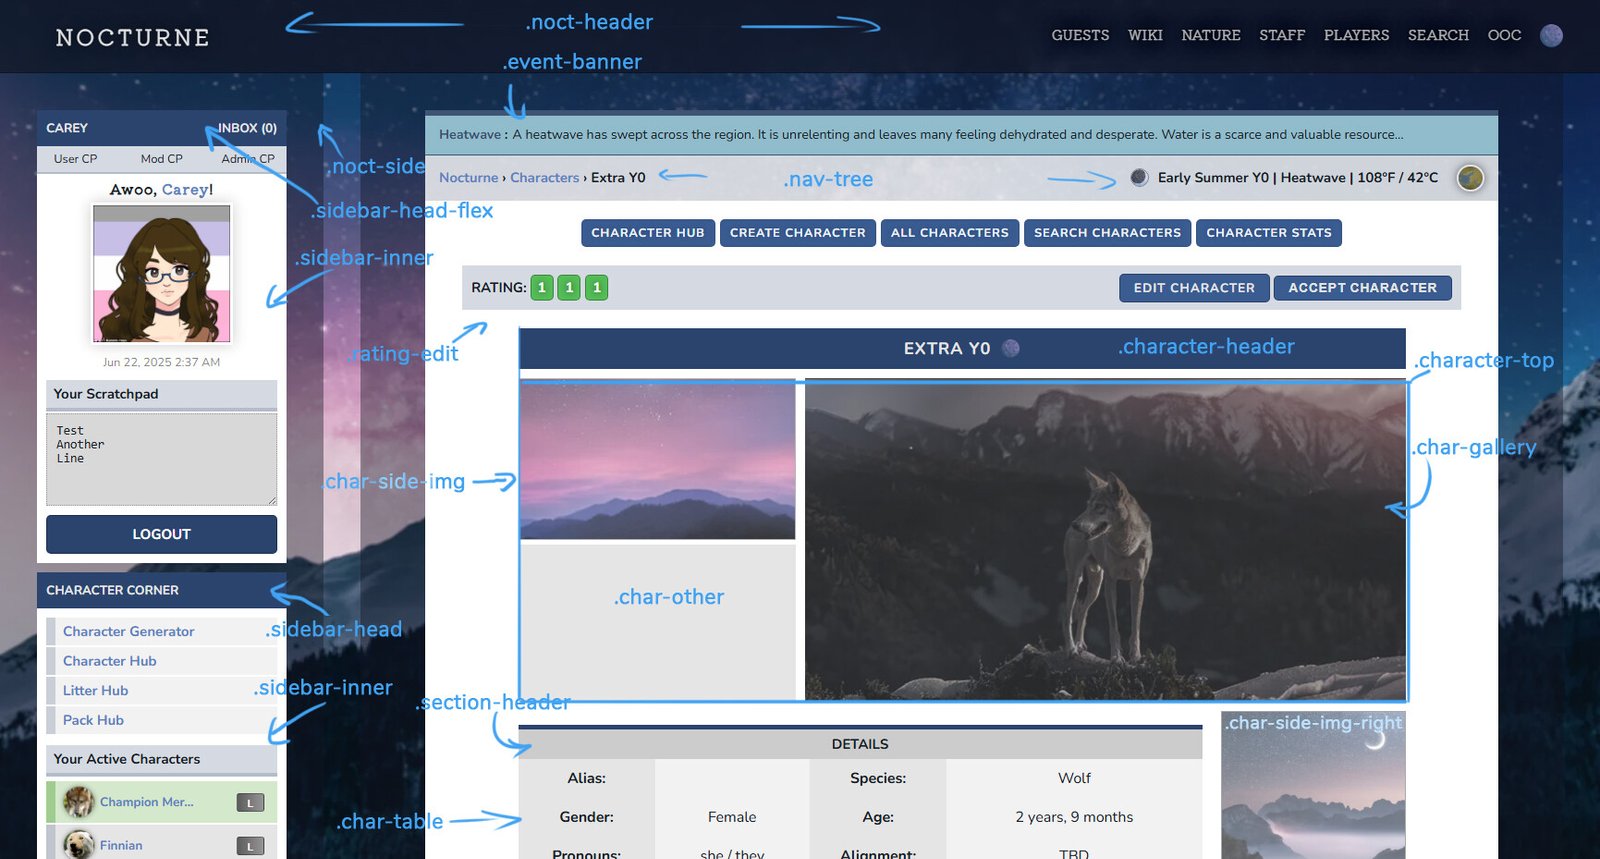
One important thing to note is that we use CSS variables on Nocturne. If you've never used them before, don't worry! They are just a quick way to apply consistent colors on pages. Everything that is a header and is violet on the Nocturne: Dawn skin, for example, is --accent-1.You can click any images on this guide to open them in another tab/window.
Additionally, there are two ways to apply color:
OK, but how do I color the profile already?
Well, I've broken down every variable that is used on character profiles so you can easily play with them and recolor the profile! The image below has everything color-coded for easier highlight and understanding. If you want to change very specific parts of the profile, add boxes, etc then check out the next section.
If you copy-paste this into your character profile and change the colors, it should change the colors of everything on the profile. Then, just adjust to your needs. Anything not affected by these varibles can be covered in the next section.
:root {

  --header-footer-bg: #FFB6C177;

  --content-bg: #00000077;

  --event-bg: #FFFFE0;

  --event-border: #FFE4B5;

  --accent-1: #A52A2A;

  --accent-2: #4682B4;

  --btn-bg: #2E8B57;

  --btn-hover: #00FF7F;

  --secondary-bg: #FFF5EE;

  --link-color: #008000;

  --link-hover: #006400;

  --black-05: #BDB76B;

  --black- 10: #BDB76B;

}
Fine-Tuning Character Profiles
This is where things can get a little more complex but the important thing to remember is that most of this is controlled simply by adding classes to your CSS and changing stuff. I've included a list of all classes used on character profiles as well as three images you can open for very specific examples of which boxes and sections are which.If you'd like to apply a background to your character's profile you can do so as:
.body { background: url(URLHERE) !important; }This will seem like a lot - but you'll notice a lot of areas on this page use the same classes, just in different areas.
Primary Character Classes:

.char-top

.character-other

.char-side-img

.char-gallery

.character-body

.char-left

.section-header

.char-table

.char-table th

.char-table td

.char-description

.char-appearance

.char-shortpers

.char-personality

.char-history

.char-sidebar-misc


Additional classes:

.noct-header

.event-banner

.noct-side

.sidebar-head-flex

.sidebar-inner

.rating-edit

.sidebar-head

.sidebar-inner

.nav-tree
Adding To Profiles
Here's where customization gets fun! You can add your own boxes, images, etc to your character's profile and then use CSS to style them. We'll use Hélios as our example again, since I've set him up for this example. As you see, you can add columns pretty easily to the large text areas of your profile which include: appearance, personality, history.
<div>

   <p>Column 1 content</p>

   <p>Column 2 content</p>

</div>
Now that you have that added, add this to your CSS box:
	.char-description div {
    	display: flex;
        flex-direction: row;
    }
What this code does is tells the <div> inside your text area to treat everything inside of it as one row broken into columns. So it aligns everything left to right. You can add additional <p> tags to add more columns. You'll also need to add classes to any elements inside the div you add. For example, the image I included on Hélios' profile is class="app-img". This means that in the css I also have to add .app-img { width: 40%; }.
Using your own classes on any divs, spans, images, or other items you add means you style them as you like in the css!
Getting More Specific
Let's say you want to add a scroll box to one of our table boxes such as habits, quirks, siblings, etc. Or, maybe you want to change how this text is aligned. All you need to do is apply the above logic to do the same thing.For example an easy scrollbox is:
In your content area:

<div class="scroll-box">

  Words here

</div>


In your CSS:

.scroll-box {

  width: 100%;

  height: 250px;

  overflow: auto;

}
If you'd like to add custom spans or divs, you can do that too, but adding "style=" does not work inside character profiles. Instead, handle it like this:
Inside the content areas:
<div class="custom-class">

  Words here

</div>


In your CSS:

.custom-class {

  background: color;

  width100%;

  color: color;

}


or really, any other styling you want to do. as long as you apply a class to it, you can get it to do what you'd like in the css.
If you also want to justify the text you can do text-align: justify; You can also add a border, change the background color, or honestly make any CSS tweaks you need. If you dont' know CSS or HTML well just ask, and one of us will happily help you make tweaks and adjustments. But! With these few tips in mind you should be able to fully customize your character's profile.
Removing Profile Elements
While you CAN apply display:none; to different parts of your character's profile, please do not apply them to:
Essentially, do not remove anything that allows people to perform basic functions or to navigate away. If you remove important character details please write them into the profile.
For quick reference, these are all fields you need to write back in if you remove them:
If you'd like to remove all elements from a profile (after the gallery) you can add this to your css, and then add all content to the "appearance" box.
.section-header,

.char-description,

.char-table,

.char-shortpers,

.char-personality,

.char-history {

  display: none;

}


.char-appearance {

	display: flex;

    flex: 1;

}
There are downsides to this!
If you hide all .char-table items then you lose valuable access to important details about your own character such as pregnancy tracking, live age tracking, etc. What you can do instead is be more specific and choose among these classes: .char-details, .char-details2, .char-details3, .char-attributes, .char-relations, .char-ooc.
If you add this, it will give you a result like:
You can additionally add .character-top to the list of elements you hide which will hide the character avatar, gallery, and other box and give you this as a result:
If you remove any elements and need to quickly re-add them, we have quick codes for that! So if you want to use the code I provided above to remove everything except the "appearance" div (or personality, or history - your choice), you can use the custom codes below to re-add required information in any format of your choosing. These codes work inside the appearance, personality, and history containers. So as long as you leave one of those showing and put these short codes inside of it, you can re-add any information you remove.
| Shortcode | Description |
|---|---|
| {firstname} | Character's first name |
| {lastname} | Character's last name |
| {fullname} | First + last name |
| {alias} | Nickname or alias |
| {gender} | Gender label |
| {pronouns} | Pronouns |
| {age} | Character's age |
| {weight} | Weight (freeform field) |
| {mass} | Alternate weight descriptor (if used) |
| {height} | Height (freeform field) |
| {pregnant} | Shows pregnancy status and weeks along |
| {health} | Overall health field |
| {cond} | Physical condition or afflictions |
| {species} | Species type |
| {eyes} | Genetic eye color |
| {lefteye} | Left eye color (visible) |
| {righteye} | Right eye color (visible) |
| {fur} | Fur color or pattern |
| {personality} | Full personality section |
| {persshort} | Short personality blurb |
| {alignment} | Character’s alignment or worldview |
| {habits} | Notable habits |
| {quirks} | Character quirks or oddities |
| {morals} | Beliefs or moral compass |
| {history} | Character backstory |
| {chargroup} | Current pack or troupe of that character |
| {pack#} | Display any pack based on their ID |
| {pack:name} | Display pack based on name such as {pack:stinkywuffers} |
| {sire} | Sire's name (linked if available) |
| {siblings} | List of siblings |
| {extendedrels} | Extended family (aunts, uncles, cousins) |
| {partner} | Current mate or partner |
| {children} | List of offspring |
| {relations} | Notable relationships |
| {other} | Other notes or fields |
| {cavatar} | Full-size character avatar |
| {cavatarsmall} | Small-sized avatar |
| {appearance} | Appearance description |
| {mutation} | Mutation or abnormal traits |
| {misc} | Any miscellaneous profile info |
Last Edited: July 17, 2025
Editor: Carey


